chapter 6
DHT22 Temperature and Humldity sensors
The DHT22 temperature and humidity sensor is a reliable and cost-effective device designed to measure ambient temperature and humidity across a wide range of applications. It provides digital signal output with high accuracy, offering a resolution of 0.1°C for temperature and 0.1% for humidity. The sensor operates using a capacitive humidity sensing element and a thermistor for temperature measurement. With its low power consumption and ability to run on a 3.3V to 5V supply, the DHT22 is well-suited for both standard and battery-powered projects. Thanks to its long-term stability and high reliability, this sensor is widely used in systems such as HVAC control, weather monitoring stations, and indoor air quality applications. In this tutorial, we’ll walk you through how to interface the DHT22 with an Arduino UNO, explaining each step in detail. So, without further delay, let’s get started
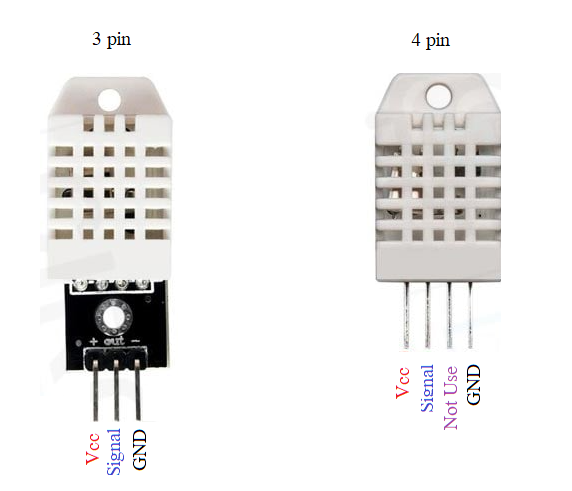
The DHT22 sensor is available in two forms: a 3-pin module and a 4-pin bare sensor.
In the 3-pin module two pins are used for power (VCC and GND), while the third pin is the data pin.
In the 4-pin bare sensorthere is an additional pin labeled NC (No Connection), which serves no function.
The pin diagrams for both the DHT22 module and the bare sensor are shown below.
https://circuitdigest.com/microcontroller-projects/interface-dht22-sensor-module-with-arduino

Circuit Diagram of DHT22 Module
The complete schematic diagram of the DHT22 Temperature and Humidity Sensor Module is shown below

The DHT22 module's schematic diagram is shown above. As previously stated, the board has only a few members. The VCC and GND pins are linked directly to the DHT22, and a pullup resistor is attached to the DATA pin. Tantalum and multilayer capacitors offer enough filtering. As a power indication, and in some PCBs, you can find an indicator LED, but for most of the board the LED is not present.
DHT22 Single-Bus Communication Protocol
The DHT22 sensor communicates with a microcontroller using a single-bus protocol. Each data transmission takes approximately 4 ms and consists of both integer and decimal parts. The complete data frame is 40 bits long, transmitted in MSB (Most Significant Bit first) format.
The data format is structured as follows:
- 8-bit integral RH data
- 8-bit decimal RH data
- 8-bit integral temperature data
- 8-bit decimal temperature data
- 8-bit checksum
The checksum is the sum of the first four data bytes:
Checksum = (Integral RH + Decimal RH + Integral T + Decimal T) & 0xFF
If the checksum matches, the data transmission is considered valid. When the MCU (microcontroller unit) sends a start signal, the DHT22 switches from low-power mode to active mode. It then sends the complete 40-bit data packet to the microcontroller, which processes the binary data to calculate temperature and humidity values.

DHT22 Sensor specifications
- Temperature range: -40 to 80ºC +/- 5ºC
- Relative humidity range: 0 to 100% +/-2%
- Temperature resolution: 0.1ºC
- Humidity resolution: 0.1%
- Operating voltage: 3 to 6 V DC
- Current supply: 1 to 1.5 mA
- Sampling period: 2 seconds
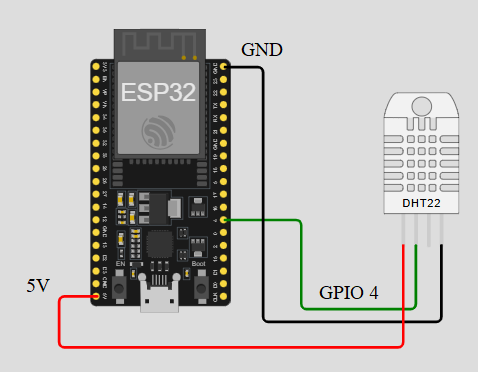
Circuit Diagram for Interfacing DHT22 Sensor

demostration of DHT22 with ESP32
This tutorial shows how to use the DHT22 temperature and humidity sensors with the ESP32 using Arduino IDE. We’ll go through a quick introduction to these sensors, pinout, wiring diagram, and finally the Arduino sketch. but in this demostration.we will use Wokwi Simulator.
Circuit diagram
use wokwi Simulator to demostration by Circuit diagram below.
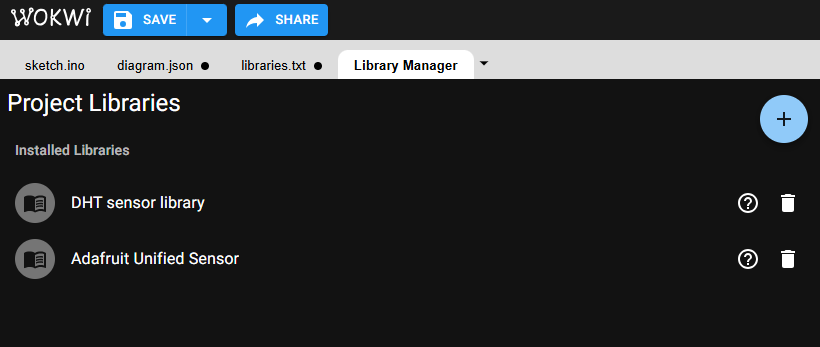
Libraries for DHT22
To read from the DHT sensor, we’ll use the DHT library from Adafruit. To use this library you also need to install the Adafruit Unified Sensor library. Follow the next steps to install those libraries. Open your Arduino IDE and go to Sketch > Include Library > Manage Libraries. The Library Manager should open. Search for “DHT” on the Search box and install the DHT library from Adafruit.
https://randomnerdtutorials.com/esp32-dht11-dht22-temperature-humidity-sensor-arduino-ide/
After installing the necessary libraries,The following code should load. It reads temperature and humidity, and displays the results in the Serial Monitor.
#include
#include
#define DHTPIN 4 // Digital pin connected to the DHT sensor
#define DHTTYPE DHT22
DHT dht(DHTPIN, DHTTYPE);
void setup() {
Serial.begin(9600);
dht.begin();
}
void loop() {
delay(1000); // Wait a few seconds between measurements.
float h = dht.readHumidity();
float t = dht.readTemperature();
Serial.print("Humidity: ");
Serial.print(h,1);
Serial.print("% Temperature: ");
Serial.print(t,1);
Serial.println("C");
}
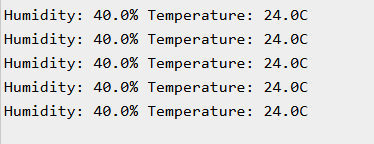
When you click Run Button, A dialog will appear in the serial monitor, as shown in the image.